

Hello Guys ! Today I will be showing you how we can deploy our apps on Heroku cloud in quick and easy steps. For this example I will be deploying a Flask application on Heroku using Heroku CLI. So just stay along with me till the last of this tutorial as I will be describing each and every step of the process.
Project deployment tends to be cumbersome especially if your deploying on cloud servers and one such example is of deploying apps on Heroku clouds. So without any further ado lets get started but that lets first of all get familiar with some of the terms below –
Heroku
Heroku is a cloud platform that lets companies build, deliver, monitor and scale apps. They provide cloud hosting services with preconfigured environments where we can host our applications. Heroku besides providing excellent service, is also very well documented so newbies find easy to get along with it. 🙂
Heroku provides their services in multiple tiers i.e. starting from $ 0 to $250 per month. For educational purpose I will be using the free tier of Heroku. In order to learn more about Heroku please visit their official website.
Heroku CLI
Heroku provides software for command line interface which can be used to run Heroku specific commands. The Heroku Command Line Interface (CLI) makes it easy to create and manage your Heroku apps directly from the terminal. It’s an essential part of using Heroku. You can download Heroku CLI for windows and Mac OS from the below links –
- Windows 32 bit installer
2. Windows 64 bit installer
3. For Mac OS run brew tap heroku/brew && brew install heroku
Also note that The Heroku CLI requires Git, the popular version control system. If you don’t already have Git installed, please install and set up it before proceeding with the installation of Heroku CLI.
Flask Framework
Flask is a micro web framework for Python and can be used to build Web applications in python quick and easy.
WELL THAT’S ENOUGH OF THE THEORY. I FEEL LIKE BLOWN NOW !!!

Now after the reaction of the gentleman above I would rather like to proceed with procedure straightaway.
So the very first step is to install Heroku CLI in your system as we will be using it in the deployment process (links provided above). Once done with the installation, lets create a sample project using Flask framework. For this example I will be creating a web api application, so just follow the steps as below –
- Create a project directory and create a virtual environment inside it using the below command
virtualenv your-env-name. - Now issue below commands to activate the virtual environment and install the required python packages in your environment.
your-env-name/Scripts/activate (for windows) or source your-env-name\bin\activate
pip install Flask Flask-Cors
3. Once all the dependencies are installed we will proceed with the application building process. I will be creating two route api for this demo, so please create a new python file inside your project folder and name it as app.py and write the below codes in it.
from flask import Flask, request,send_file
from flask_cors import CORS, cross_origin

app = Flask(__name__)
cors = CORS(app)
app.config['CORS_HEADERS'] = 'Content-Type'


@app.route('/')
@cross_origin()
def home():
    data = {'page':'home','service':'Hello World'}
    return json.dumps(data)


@app.route('/fetch-hello', methods=['POST'])
@cross_origin()
def fetch_hello():
    if request.method == 'POST':
       name = request.form['person_name']
       message = 'Hello '+name
       data = {'page':'home','service':message}
       return json.dumps(data)
    else:
      return 'error'

if __name__ == '__main__':
    app.run()
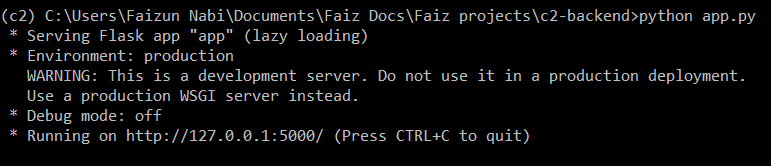
Please note that here I am using Flask-Cors library to avoid the CORS policy issue while making request to our web-api from a different server location. So now lets run our application using python app.py. If the application runs successfully you will see something like this –
We are now ready with our application so lets proceed with the deployment of it. In order to run our application we will need a server gateway and we will be using Gunicorn for this, so install gunicorn in your project using below command-
pip install gunicorn
Now that we are done installing all the project dependencies lets create requirements.txt file and run the below command –
pip freeze > requirements.txt
Our requirements.txt file will get populated with all the project dependencies along with their installed version.
Proceeding with the deployment, please a new file inside project directory with the name Procfile without any extensions. Please note that Procfile is a Heroku specific file which tells Heroku which process to run in the application, so basically THIS IS A VERY IMPORTANT STEP.

Open your Procfile and write the below code –
web: gunicorn app:app
Here we declare the process type as “web” since its a web application that we are going to deploy. Next is the simple gunicorn command stating to run “app” process from “app” module. Here since we named our application file as “app.py” and also declared the Flask object as “app” so we are using “app” in both instances otherwise your can change the file name or object name as per your choice.
Ok now lets jump to the command prompt and type the below command –
heroku login
After passing this command you will be prompted to login to Heroku platform in your default browser. So if you already have an account please login now or else register yourself.
Once you are logged in the command prompt will automatically detect your login. Now create an app in Heroku using the below command
heroku create your-app-name
Once the app gets created, the command prompt will provide you with your git URL and your project access URL. I would suggest you to note both of these somewhere safe as you will be needing them very soon.
Now we need to push our project to the master branch of the git repository created above. So follow the below commands to push your project –
git add .
git commit -am "First Commit"
git push heroku master
Once you push your application, Heroku will install all the project dependencies from your requirements.txt file and run your application as stated in Procfile.
And if everything goes well you will able to see beautiful Hello World message on navigating to your project access URL.
In case you find that your application apis are not responding as expected you can always check the logs in real time using heroku logs -t.
With this we reach the end of this tutorial. I hope you enjoyed it and find it useful. In case you need any further clarifications or else want to share your views about this tutorial please comment below. I will see you in the next tutorial, Good Bye and Take Care.
