


Hello Everyone ! In this post I am going to show you how to develop a real GPS tracking device simulation using .NET Windows Forms in C#.For this tutorial please note we are simulating GT06N device,which is world’s most commonly used tracking device.
If by any chance you are familiar with this device you might be knowing that this device works on TCP protocol system.Recently, I got involved in a Vehicle tracking system project where we were using the same device.Now for testing our project we had to have someone who will drive through with the device so that we can get the real-time tracking data, which in turn was getting costly as we had to test the app several times in one day. That’s why we decided to develop a simulator for this device so that we can perform similar actions as performed by the device and we recorded the real time location data emitted by the real device in a text file.Now to get you familiar please note that this device echos its tracking data in an encrypted Hex format which looks something like this :
`78781f1211021a0b3619c7029ebc3405dd29f800541d01a8025660001a2e009754200d0a`
Now explaining what this string is totally out of the scope of this tutorial 🙂
So lets proceed with what we have in our scope.
First lets open Visual Studio and create a new .net windows forms application.
Now that our project is created lets start by creating the UI of our application.With some drag and drops we achieve the below layout
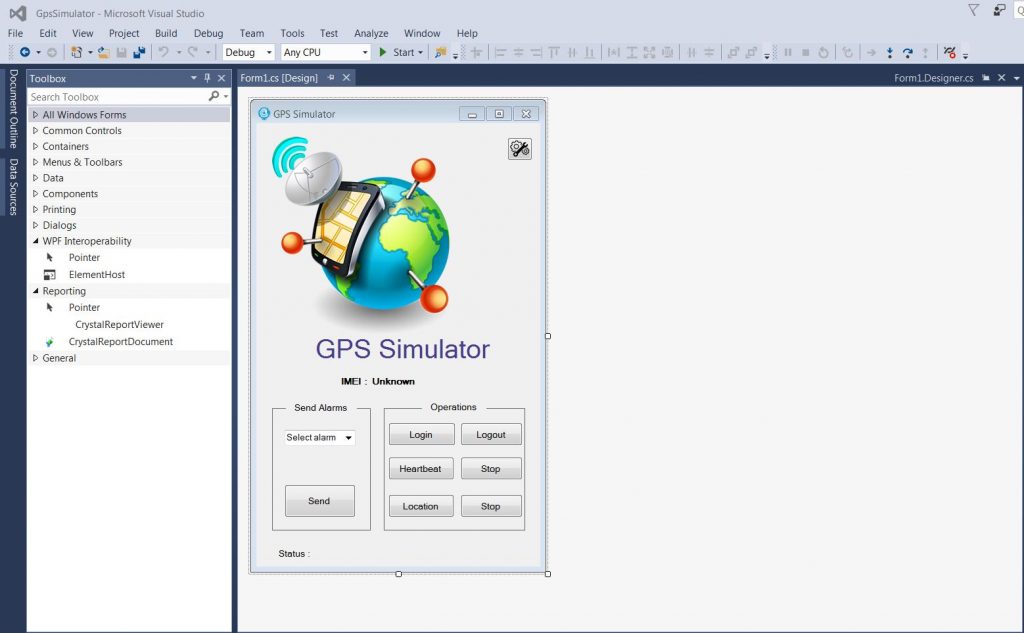
Now lets populate our ComboBox by clicking on it and the selecting the Edit Items option.

Now that we are done with our UI,lets get our hands dirty by writing some Logic codes in C#.So open your .cs file by double clicking on any element of the UI. Once the file is open type the below code to import the classes and packages that we will be using and also define some variables so that they can be accessed globally in the class.
using GpsSimulator.Properties;
using System;
using System.Collections.Generic;
using System.ComponentModel;
using System.Data;
using System.Drawing;
using System.IO;
using System.Linq;
using System.Net.Sockets;
using System.Text;
using System.Threading;
using System.Threading.Tasks;
using System.Windows.Forms;

namespace GpsSimulator
{
    public partial class Form1 : Form
    {
        private  int portNum = Settings.Default.Portnumber;
        NetworkStream ns;
        System.Net.Sockets.TcpClient clientSocket;
        private  string hostName = Settings.Default.Hostname;
        string[] locations;
        private Thread heart_thread = null;
        private Thread location_thread = null;
        Boolean hs = true;
        Boolean ls = true;

        public Form1()
        {
            InitializeComponent();
            this.status.ForeColor = Color.DarkRed;
            this.status.Text = "Disconnected";
            this.label6.Text = Settings.Default.IMEI;
            string content = File.ReadAllText(@"location_data.txt");
            locations = content.Split(',');

        }
    }
}
Note : We are using the file to get the location data.So copy this file in your project folder as well.
Next, double click on the start button from the UI and write the code logic for this button.
private void strt_bt_Click(object sender, EventArgs e)
        {
            clientSocket=new System.Net.Sockets.TcpClient();
            clientSocket.Connect(hostName, portNum);
            ns = clientSocket.GetStream();
            byte[] outStream = System.Text.Encoding.ASCII.GetBytes("78780d010"+Settings.Default.IMEI+"000285680d0a");
            ns.Write(outStream, 0, outStream.Length);
            ns.Flush();
            byte[] inStream = new byte[10025];
            ns.Read(inStream, 0, (int)clientSocket.ReceiveBufferSize);
            if (inStream != null)
            {
                this.status.ForeColor = Color.Green;
                this.status.Text = "Connection successful.";
                heart_thread = new Thread(new ThreadStart(send_heartbeat));
                location_thread = new Thread(new ThreadStart(send_location));
                heart_thread.Start();
            }
        }
That’s done and now we proceed to write the code for the stop button similarly.
private void stop_bt_Click(object sender, EventArgs e)
        {

            if (heart_thread.IsAlive)
            {
                heart_thread.Abort();
            }
            if (location_thread.IsAlive)
            {
                location_thread.Abort();
            }
            clientSocket.Close();
            this.status.ForeColor = Color.DarkRed;
            this.status.Text = "Disconnected";
        }
Now lets deal with the harder part now, the send location button.We read the data from the text file and send this as a raw string .
private void send_location()
        {
            foreach (string l in locations)
            {
                byte[] outStream = System.Text.Encoding.ASCII.GetBytes(l);
                ns.Write(outStream, 0, outStream.Length);
                ns.Flush();
                Thread.Sleep(10000);
            }
        }
Please note that we are using Thread.Sleep and setting the time interval to 10 seconds which means that the simulator will send the data every 10 seconds.
Now lets add the logic for our heartbeat button.
private void send_heartbeat()
        {
            while (hs)
            {
                byte[] outStream = System.Text.Encoding.ASCII.GetBytes("787808134B040300010011061F0D0A");
                ns.Write(outStream, 0, outStream.Length);
                ns.Flush();
                Thread.Sleep(10000);
            }
        }
Now lets add the logic for the send alarm button.
private void send_bt_Click(object sender, EventArgs e)
        {
            string al_type = comboBox1.Text;
            string al_code;
            switch (al_type)
            {
                case "SOS":
                    al_code = "01";
                    break;
                case "POWER CUT":
                    al_code = "02";
                    break;
                case "SHOCK":
                    al_code = "03";
                    break;
                case "GEO-FENCE IN":
                    al_code = "04";
                    break;
                case "GEO-FENCE OUT":
                    al_code = "05";
                    break;
                default:
                    al_code = "00";
                    break;
            }

            byte[] outStream = System.Text.Encoding.ASCII.GetBytes("7878251611080d0c3111c7029ebc3405dd29f800441d0901a8025660001a2e100604"+al_code+"02004ebd950d0a");
            ns.Write(outStream, 0, outStream.Length);
            ns.Flush();
        }
Now lets add the logic for the logout button like this.
private void logout_bt_Click(object sender, EventArgs e)
        {

            if (heart_thread.IsAlive)
            {
                heart_thread.Abort();
            }
            if (location_thread.IsAlive)
            {
                location_thread.Abort();
            }
            clientSocket.Close();
            this.status.ForeColor = Color.DarkRed;
            this.status.Text = "Disconnected";
        }
At last lets add for the stop buttons for heartbeat and locations like this.
private void heart_stop_Click(object sender, EventArgs e)
        {
            if (heart_thread.IsAlive)
            {
                heart_thread.Abort();
            }
        }

private void stop_location_Click(object sender, EventArgs e)
        {
            if (location_thread.IsAlive)
            {
                location_thread.Abort();
            }
        }
With that’s done we have reached the end of our tutorial. You can now compile and run this project and start sending the data to your TCP server.

i am from Italy hello. Can you help me translate? /rardor
Hello ! I will be glad to help you. Please tell me which part you are unable to understand.
Thank you very much for the invitation :). Best wishes.
PS: How are you? I am from France 🙂
Hello SYED FAIZUNNABI , I have simple project related to the simulator and windows Form , would You mind helping me please, It would be very nice if u replied me . Please let me talk With You.(any contact details ?).
Hi Bishal…thanks for your comment.
Please check your inbox for the contact details.